Keeping your hearing aids clean is one of the most important steps you can take to ensure they continue delivering clear, consistent sound every day. Because hearing aids sit either in or behind the ear, they naturally come into contact with earwax, oils, moisture, and debris — all of which can build up over time and block important components like microphones, receivers, and vents. Even small amounts of residue can cause muffled sound, whistling, or discomfort, making routine cleaning an essential part of caring for your devices.
In this article, we’ll take a friendly, practical approach to understanding how to clean hearing aids safely and effectively. Whether you use behind-the-ear (BTE), receiver-in-canal (RIC), or in-the-ear (ITE) styles, you’ll learn simple daily habits and more thorough weekly routines that can help extend the life of your devices. We’ll also explore what not to do, when to seek professional help, and how cleaning ultimately protects your investment — and your hearing health. Clean hearing aids aren’t just about maintenance; they’re about making every conversation, moment, and sound as clear and enjoyable as possible.
Why Hearing Aid Cleaning Matters
Regular cleaning of your hearing aids isn’t just about keeping them looking tidy — it directly affects how well they perform and how long they last. Because these devices operate in a warm, moist environment filled with natural oils and earwax, it’s easy for delicate components to become blocked or damaged over time. When microphones or receivers become obstructed, sound quality drops, leading to muffling, distortion, or feedback. A simple daily wipe-down can prevent most of these issues, helping your devices deliver the clarity they were designed to provide.
Clean hearing aids are also better for your ear health. Earwax buildup on the device can introduce bacteria into the ear canal, increasing the risk of irritation or infection. For adults 50+—who may already be managing sensitive skin, dryness, or other ear-related concerns—keeping hearing aids clean plays a crucial role in long-term comfort and safety. By preventing debris from transferring into the ear, you help maintain a healthier environment for both your ears and your devices.
Finally, regular cleaning is one of the best ways to extend the life of your hearing aids and avoid unnecessary repairs. Moisture, wax, and dust are leading causes of breakdowns, often requiring professional servicing or part replacements. When you incorporate consistent cleaning into your daily routine, you protect your investment and reduce the likelihood of unexpected malfunctions. Overall, taking a few minutes each day can significantly improve reliability, comfort, and your overall listening experience.
Daily Cleaning Steps for Hearing Aids
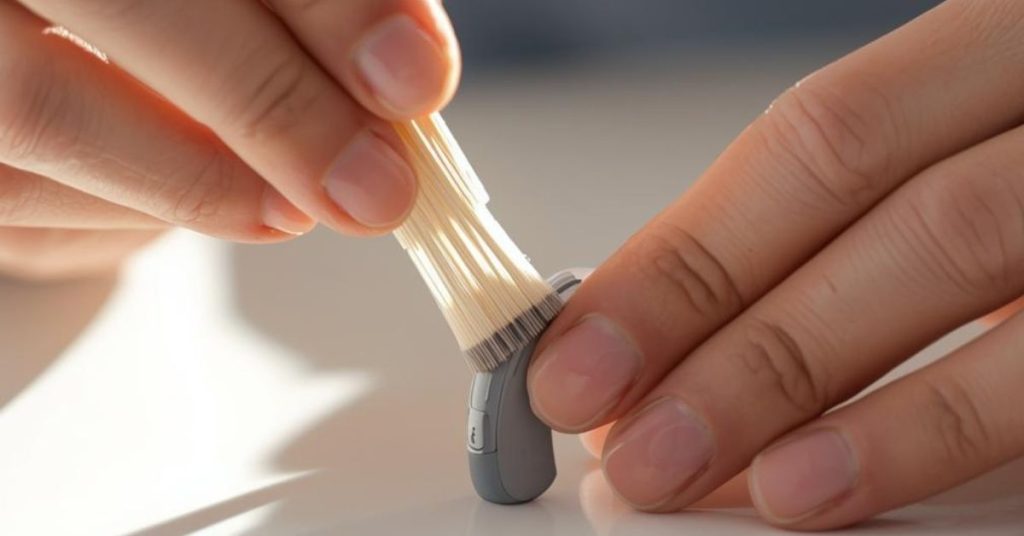
Daily cleaning is one of the simplest and most effective habits for keeping your hearing aids clear, comfortable, and functioning at their best. Because these devices are exposed to sweat, oil, and earwax throughout the day, a quick end-of-day routine helps prevent debris from hardening or blocking essential components. You don’t need any complicated tools—just a soft, dry cloth and a basic cleaning kit that typically includes a small brush, wax loop, and vent cleaner.
Start by gently wiping the entire surface of your hearing aids with a clean, dry cloth. This removes oils, moisture, and dust before they can work their way into tiny openings. For behind-the-ear (BTE) and receiver-in-canal (RIC) models, use the small brush to clean around microphone ports, taking care not to push debris inward. RIC styles also have receivers that sit inside your ear canal, so use a wax loop or pick to carefully remove any buildup around the tip. If your device uses wax guards, check them each day to see if they need replacing—these tiny components play a big role in protecting sound quality.
For in-the-ear (ITE) hearing aids, daily cleaning is especially important because the device sits entirely inside the ear canal. Use a soft brush to gently sweep away wax near openings and vents, and use the vent cleaner if your model includes one. Avoid using water, wipes, alcohol, or household cleaners, as moisture can quickly damage the electronics. After brushing and wiping, store your devices overnight in a dry, protective case. If you have a hearing aid dehumidifier or drying box, placing your devices inside each night can help reduce moisture buildup and improve performance.
A few minutes of daily care helps ensure your hearing aids are ready to perform clearly every morning.
Deep Cleaning and Weekly Maintenance
Weekly maintenance goes a step beyond daily cleaning by addressing components that collect more stubborn debris or moisture over time. This deeper level of care helps ensure your hearing aids deliver consistent sound quality and remain comfortable to wear. While daily brushing removes surface buildup, weekly cleaning targets areas that require more attention—like wax guards, earmolds, vents, and tubing. Taking the time to perform these slightly more detailed steps can significantly extend the lifespan of your devices.
Start by examining the openings of your hearing aids under good lighting. Using your cleaning brush, gently clear away any accumulated wax or dust around microphone ports and receivers. If your devices use wax guards, check whether they appear clogged; if so, replace them according to your manufacturer’s instructions. Wax guards are small but powerful components that protect the receiver from blockage, and a fresh one can instantly improve sound clarity. For in-the-ear (ITE) models, also check the vents and use a vent-cleaning tool to gently push out any debris that may be trapped inside.
For behind-the-ear (BTE) hearing aids that use earmolds or domes, weekly maintenance should include removing and cleaning these attachments. Earmolds—especially those made of soft materials—can be washed with warm, soapy water, then fully dried before reattaching. Domes, on the other hand, should not be washed but can be wiped gently and replaced regularly. If your BTE uses tubing, inspect it for moisture droplets, discoloration, or stiffness. Tubing that feels brittle or blocked may need replacing, which is usually a quick fix that can be done at home or by your hearing care provider.
Moisture management is another important part of weekly care. Even if you wipe your devices daily, humidity and sweat can accumulate in tiny internal spaces. Using a hearing aid dehumidifier—either a simple drying jar or an electronic drying box—can help remove this moisture and protect sensitive electronics. Many people make this part of their nightly routine, but incorporating it at least once or twice per week can make a noticeable difference.
What Not to Do When Cleaning Hearing Aids
While regular cleaning is essential for good hearing aid performance, using the wrong methods or tools can accidentally damage your devices. Hearing aids contain delicate microphones, receivers, and circuitry, so it’s important to avoid anything that could introduce moisture, abrasion, or pressure. Understanding the most common cleaning mistakes helps you protect your investment and prevent avoidable repairs.
One of the biggest mistakes is using water, alcohol, or household cleaning products on hearing aids. Even a small amount of liquid can seep into vents or openings and damage electronic components. Similarly, antibacterial wipes or soap may seem convenient, but they can leave residue that interferes with sound quality. Another frequent issue is applying too much force while brushing or picking at debris. Pushing wax into the microphones or vents instead of gently lifting it out can create blockages that are far more difficult to remove.
Heat exposure is another common hazard. Some people attempt to speed up drying by placing their devices near a heater, blow dryer, or in direct sunlight—but high temperatures can warp plastic, damage wiring, or weaken adhesives. Instead, always allow your hearing aids to air-dry or use a proper hearing aid dehumidifier. You should also avoid using sharp objects like needles, pins, or toothpicks to remove debris. These can scratch the device, puncture delicate components, or break off inside vents.
Finally, never attempt to open or repair your hearing aids yourself. Internal components are designed to be serviced only by trained professionals, and opening the casing may void your warranty. If you notice persistent problems after cleaning—such as muffled sound, feedback, or intermittent performance—it’s best to contact your hearing care provider. Professional maintenance ensures your devices are handled safely and effectively.
When to Get Professional Hearing Aid Cleaning
Even with consistent at-home care, there are times when your hearing aids need a deeper level of cleaning than you can safely provide on your own. Professional cleanings are an essential part of maintaining long-term performance, preventing damage, and ensuring every component is working the way it should. Hearing care providers have specialized tools—such as micro-vacuum systems, suction devices, and magnification equipment—that can remove wax and debris from areas you can’t reach at home.
One clear sign your hearing aids need professional cleaning is if the sound becomes persistently muffled or distorted even after you’ve replaced wax guards and brushed the microphones. This often means wax or debris has built up deeper inside the device. Moisture-related issues are another common reason to seek help. If your hearing aids frequently cut out, crackle, or behave inconsistently—especially in humid environments—there may be internal moisture damage that requires expert attention. Similarly, if you notice visible debris trapped in vents or openings that won’t come out with your regular cleaning tools, a professional cleaning can safely remove it without risking harm.
Routine professional maintenance is also valuable even when your hearing aids seem to be working well. Many hearing care providers recommend scheduling a cleaning every three to six months as part of your regular hearing health check-ups. During these visits, your provider can examine the microphones, receivers, tubing, domes, and earmolds under magnification, ensuring everything is functioning properly. They can also replace worn components, update fittings, and make small adjustments that can significantly enhance comfort and clarity.
Getting expert cleanings not only protects your devices but also helps you stay connected to your own hearing health. By partnering with your provider and combining professional care with consistent at-home maintenance, you can keep your hearing aids performing at their best for years to come.
Conclusion
Keeping your hearing aids clean is one of the simplest yet most impactful ways to protect both your hearing health and your investment in better hearing. With a few minutes of daily care—paired with more thorough weekly maintenance—you can prevent common issues such as wax blockages, muffled sound, and moisture damage. These small routines ensure that your devices remain comfortable, reliable, and ready to provide the clarity you depend on in conversations, social situations, and everyday life.
By understanding what to do—and what to avoid—you lower the risk of accidental damage and keep your hearing aids functioning at their full potential. Avoiding water, chemicals, and excessive heat helps preserve delicate components, while regular use of proper cleaning tools supports long-term performance. And when problems arise that simple cleaning can’t fix, professional support ensures your devices get the expert attention they need.
Ultimately, caring for your hearing aids is an ongoing partnership between your daily habits and your hearing care provider’s expertise. With consistent cleaning and timely maintenance, you can enjoy clearer sound, greater comfort, and the confidence that your hearing aids will continue working for you for years to come.
FAQ
What tools do I need to clean my hearing aids at home?
Most hearing aids come with a basic cleaning kit that includes a small brush, wax loop, and vent cleaner. You’ll also need a soft, dry cloth for wiping down surfaces. Optional but very helpful tools include a dehumidifier or drying box to remove moisture, and replacement wax guards for ongoing maintenance.
How often should I replace wax guards?
Wax guards should be replaced whenever they become blocked, which can vary depending on your wax production. Many people replace them every 2–4 weeks, but if you notice muffled sound, feedback, or reduced volume, checking and replacing the wax guard is a good first step.
Can I use alcohol wipes to clean my hearing aids?
No. Alcohol wipes and other household cleaners can damage the delicate components of your hearing aids. They may also leave residue that interferes with sound quality. Always use a dry cloth and tools specifically designed for hearing aid cleaning.
What should I do if my hearing aid gets wet?
If your hearing aid is exposed to moisture, wipe it immediately with a dry cloth and place it in a dehumidifier or drying box. Avoid using heat sources like a hair dryer, as they can cause damage. If performance doesn’t improve after drying, contact your hearing care provider.
How do I know if my hearing aids need professional cleaning?
If your hearing aids still sound muffled after brushing and replacing wax guards, or if you see debris you can’t safely remove, it’s time for a professional cleaning. Frequent cutouts, crackling, or moisture buildup are also signs that expert attention is needed.
This article is for informational purposes only and is not a substitute for professional medical advice, diagnosis, or treatment. If you are concerned about your hearing or ear health, please consult a qualified healthcare provider.